
Next I added a few coats of gloss to act as the base for waxing. This really shows the imperfections. I wet sanded this down to about 400 grit then polished with auto cutting compound then several coats of mould release.

Here I am setting up the flanges for the top 1/3 of my 3 part mould. I'm making it 3 part for ease of handling but the final cowl will be only 2 parts. As suggested by a fellow KR builder I will build the oil door first in the middle of the top 1/3 of the mould. Once set I'll trim it to size then hot glue back into the mould. Attach the nose 1/3 to the top 1/3 then I'll then build the upper cowl with a joggle over the oil door. Once again I'll remove the top cowl and trim it to size then return it to the mould, now adding the final 1/3 and then lay up the lower cowl with a joggle over the edge of the top cowl. A lot of up front work but it will save time down the road.
Notice I have used builders plastic to protect the forward deck, this will bite me later.

Here I have added non hardening hobby clay to the gaps in my formwork and trimmed it to form a perfect edge to the plug. The white dots are domed plastic hemispheres that have nails in them. They are used in the legs of furniture to protect them and make ideal locator sockets in the first mould flange. Once removed a corresponding dome is formed in the mating surface of the second mould flange when it is laid up.

Tooling gel-coat added, this one was spray on.

After the gel set up I filleted the acute angles with micro then 3 layers of CSM. Notice the polyester has wrinkled the builders plastic. lucky this is only in the flange area added for bagging and will not affect the final part.

Here I have added formwork for the lower flange. Again I have used the domed plastic hemispheres to make locators in the mould half.
I did not take any photos of laying up the lower 1/3 but trust me it was a real b!tc#. Wet layup upside down is no fun at all, resin drips everywhere, gets on your skin and runs down your wrists. I had those plasticated overalls on and the resin still soaked through them and burned my back. I found a neat 3" mini paint roller that was fantastic for wetting out the glass. The hairy ones are only a couple of bucks each and will wash out in acetone without falling apart.

First 1/3 removed, cleaned and trimmed. Notice the neat indents from those dome things.
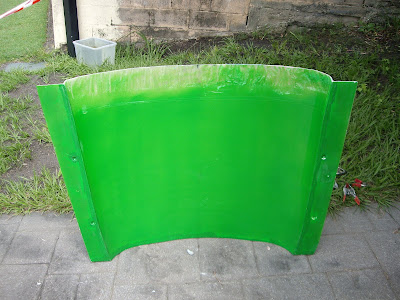
Top and bottom thirds all finished.

The nose 1/3 was a simple layup but because of it's complex curved it was difficult to remove it from the plug. So much so that I had to partially destroy the plug to get them apart (hope the moulds are good ... no going back).

All 3 parts keyed together with neat little domes and corresponding sockets.


Now all I gotta do is pull the final cowl, yeah?????

No comments:
Post a Comment