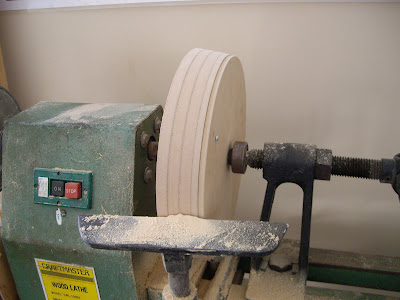
Here is the infill I made, the next few photos show how I did it.

Cut a few pieces of MDF roughly to size.

Stick them in the lathe.

Work them till the shape is what you want.

Cut the centre out with a fly-cutter to suit the prop hub.

The end result, a neat fit and it helps to hold the cowl firm from the front while I attach the chin parts permanently.

Looking good I must say. The photo above is a stack of 3 x 12mm MDF. in the photo below you can see I have added 2 additional disks to locate the stack forward and aft, exactly lining up with the front face of the hub. When the plug is finished the first stack will form part of the plug sitting 12 mm aft of the front face of the hub. I hope this will be enough clearance for the prop and spinner.

Next I wanted to work on the underside of the lower cowl. If you remember I have dropped the firewall 2.5" below the belly to allow for augmented outlets. The original cowl came with an outlet that protruded below this so more surgery was required. Previously I had made a template to bend my SS firewall ears around. Mounted to an engine stand it now makes a handy mount for working on the plug.

First job, glass a strap to stabilise the chin area of the lower cowl.

Next I marked where I needed to cut the original exit ramp. As you can see even with my 2.5" lower edge it would have protruded well below the lower edge.

Apply some temporary straps and then cut it off. I love composites, you can cut stuff away that you don't want and add things that you do.

I'm going to fill this area with foam so I built a flat sheet of glass to support it. Also in this photo you can see I have attached the lower flange to the cowl with tape straps. I will later add some more on the inside to make sure it doesn't move.

2 cans of gap filler later... I used aerosol rather than hand mixes as it is more controllable and less cleaning up. WARNING here. this stuff is air cured and goes off by drawing in humidity. If you put too thick a layer it will take a while to go off. Not a biggie, I cut through exposing a soft spot, let it cure for another 1/2 day ind it was fine. I ran out of foam, will be filling in the rest when I can get back to the shops.

A shot from the back showing how it expands. I laid it level with the wood and is slowly rose as it set.

Grab a saw and start carving.

Amazing how quickly it starts to take shape.

Here is a side profile part way through.
Next job is making up a template so a friend can turn some plugs to reduce the air inlets from 5" to 3". I cut a sheet of MDF to fit the current shape and then drew on what I thought the final shape might look like. This one obviously too sharp.
3 options for the final shape.
- Just the original rounded to the 3" size,
- Mid-length, small amount of filling required.
- Longest gets the opening close to the prop but I think it will look ugly.
Comments here, I think the mid size looks the best, what do you think?
Here is a longer view.
A friend (thanks for the fantastic job Gordon) turned plugs for me based on the template I drew earlier. First a reminder of the openings as they were.
Here with the plugs inserted. I still have to line them up properly, bond them into position and then the shaping can get serious.


1 comment:
superb,wish u all d best!!
Post a Comment