This next series of shots is the start of laying up the actual engine cowl from the mould I made earlier. You will remember I made extensive modifications to a donor cowl because I didn't like the lines, inlets and general fit. I then took a 3 part mould off this plug and am now making the final part(s).
I have decided (based on the advice of another builder) to make the cowl in 3 parts. First the oil access door, then the upper deck with a built in joggle for the oil door and last the lower cowl part, once again with built in joggle for the upper deck. Goal weight 5kg (11 pounds) For a comparison see Mark Langford's @ 3.7lbs http://www.n56ml.com/cowling.html. I think even Mark would agree this is a little too light as it gives when you sand it.
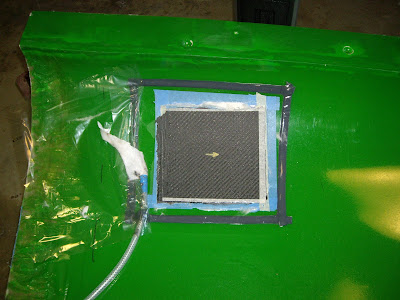
Here you can see the results of vacuum bagging the oil door. I took measurements from the oil filler neck on the engine by extending the line of the neck with a broom handle and measuring where it would meet the surface of the cowl. This became the centre of my door.

Door trimmed to size and then covered with several layers of tape to allow for the thickness of paint later on.

First attempt at vacuum bagging the top deck. I failed to get a proper vacuum on the bag as I slopped a little resin on the tacky-tape in one corner. You have to be impeccably clean when you do this. I could have salvaged it but it would have taken a little more filler and was already resin rich. A good learning experience ... isn't that what it's all about.

One of the other things I didn't like about the first attempt is that I filleted around the door edge with flox which subsequently cracked when I lifted the deck out of the mould. This and the sharp corner at the prop flange would take a little more care next time.
What I did, around the door and the prop flange, is to first lay some rovings tight into the corner. I then built the surrounding material up close to the height of the door with some scrap.

I then laid one complete layer of 45' bi-axial carbon (stitched not woven like cloth)
This time (nervous I guess) I didn't attempt to vacuum it, rather spending the extra time ensuring the right bond and resin ration by hand. Didn't come out as well as you would have expected from Vacuum but still acceptable.
In this shot I have given the peel-ply surface a light sanding and marked it up for the core-mat.

I used 3mm high density foam as my core-mat as it does not soak up resin and remains light. As you can see, very stiff right out of the box. The agent said it could be moulded with a heat gun.

Well he was right, it does mould nicely ...

And holds it's shape once cool.

I bonded the foam in with a light micro slurry and weighted the whole thing down with wet sand. This worked remarkably well.

I used 3mm high density foam as my core-mat as it does not soak up resin and remains light. As you can see, very stiff right out of the box. The agent said it could be moulded with a heat gun.

Well he was right, it does mould nicely ...

And holds it's shape once cool.

I bonded the foam in with a light micro slurry and weighted the whole thing down with wet sand. This worked remarkably well.
- Around the edges 2 strips of 45' CF
- Through the centre 2 strips of CF uni
- Then one more layer of the 45' bi-axial CF over the lot.
This time I successfully vacuum bagged this stage and the result was fantastic

As you can see I have 5 layers of CF around the edges and through the centre and 2 layers with 3mm foam everywhere else. The result is a very stiff assembly that only weighs 1.8kg (under 4lb). I'm happy with that.

Oh and the door looks real flash too.

As you can see I have 5 layers of CF around the edges and through the centre and 2 layers with 3mm foam everywhere else. The result is a very stiff assembly that only weighs 1.8kg (under 4lb). I'm happy with that.

Oh and the door looks real flash too.


No comments:
Post a Comment